
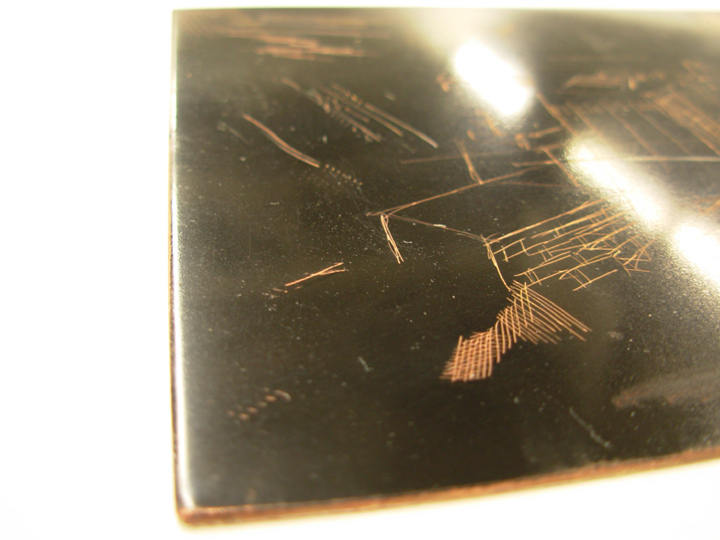
Etches
Ferric Chloride
Ferric chloride has virtually replaced the use of nitric acid and Dutch mordant as a solution for etching copper. Although etching is commonly considered a process of using acid to bite the metal, ferric chloride is actually a corrosive salt. Ferric chloride has the advantage of greatly improving the safety of etching. Ferric chloride is free from harmful gas emissions; it will stain but will not burn skin
Ferric chloride is available from most chemical suppliers in the less saturated 42 baume. The most reliable source for 48 baume (Be) ferric chloride, commonly used for photogravure, is FUJIFILM Hut Chemicals Specialty Products Group. A hygrometer is used to measure the baume of the ferric chloride. If ordering an already dilute, 42 baume (Be) solution, there is no need to adjust the solution with the addition of water.
A ferric chloride etching bath is most effective after a bit of etching has taken place. There are a few visual cues that assist in determining the efficiency of a ferric bath. When new, ferric chloride is a clear red/brown color. As copper plates are etched, the solution is a muddy brown, and remains quite effective. Once the solution turns a dark green-ish black, the bath is usually slow, and may need to be disposed neutralized and disposed of safely. (It is the addition of the copper in the ferric chloride bath that is cause for hazardous disposal)
Cupric Chloride Recipe (Copper Plates):
- 175 g salt
- 125 g sodium bisulfate
- 200 ml hydrogen peroxide
- 200 g copper sulfate
- 7.5 L water
Copper Sulfate Recipe (Aluminum Plates):
- 128 g copper sulfate
- 128 g salt
- 1/4 oz sodium bisulfate
- 7.5 L water
Etching Times
Several considerations come in to play when determining the length of time, one should expose the plate to the etchant. Higher temperature speeds up the action of the etchant. The strength or baume of the ferric chloride, and the amount of use the solution has an impact with the speed of the etch. The best way to determine the effect of an etchant on the plate is by experimentation and observation. It is advisable to etch a small test plate to determine the strength of the bath and the effect time has on the exposed plate. It is recommended to test a plate with double the exposure time with each period in the bath. Begin with 1 minute, then 2 minutes, then 4 minutes, 8 minutes, 16 minutes, 32 minutes, and so on. This test plate will provide a great deal of information quite quickly and will help in making decisions about how the ferric chloride bath effects the weight of the etched line prior to getting involved with a large plate.
Etching Procedure
- The back of the plate must be covered with acid resist prior to etching. If the plate is not going to be heated, as when melting rosin or applying softground, contact paper is a simple solution.
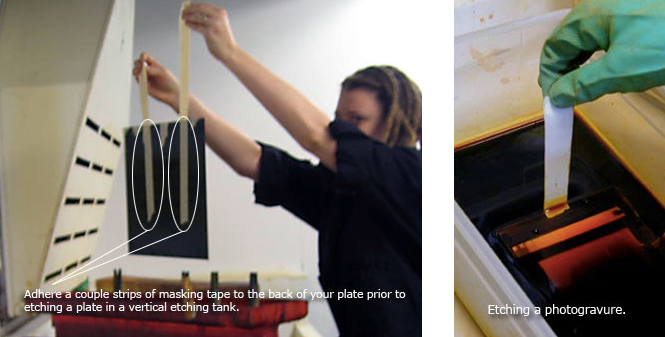
- Firmly adhere several pieces of masking tape to the back of the plate prior to immersing your plate in the ferric chloride tank. The masking tape functions as a handle for lowering the plate into the bath. Burnish the tape well to assure good adhesion to the plate.
-
Lower the plate into the etching bath until the top edge is fully immersed. Periodically check on the plate while etching.
- When removing the plate from the etching bath, remove lift the plate directly above the bath, lower one corner, and let the ferric chloride drip back into the bath. Do not let solution drip on the counter or on yourself.
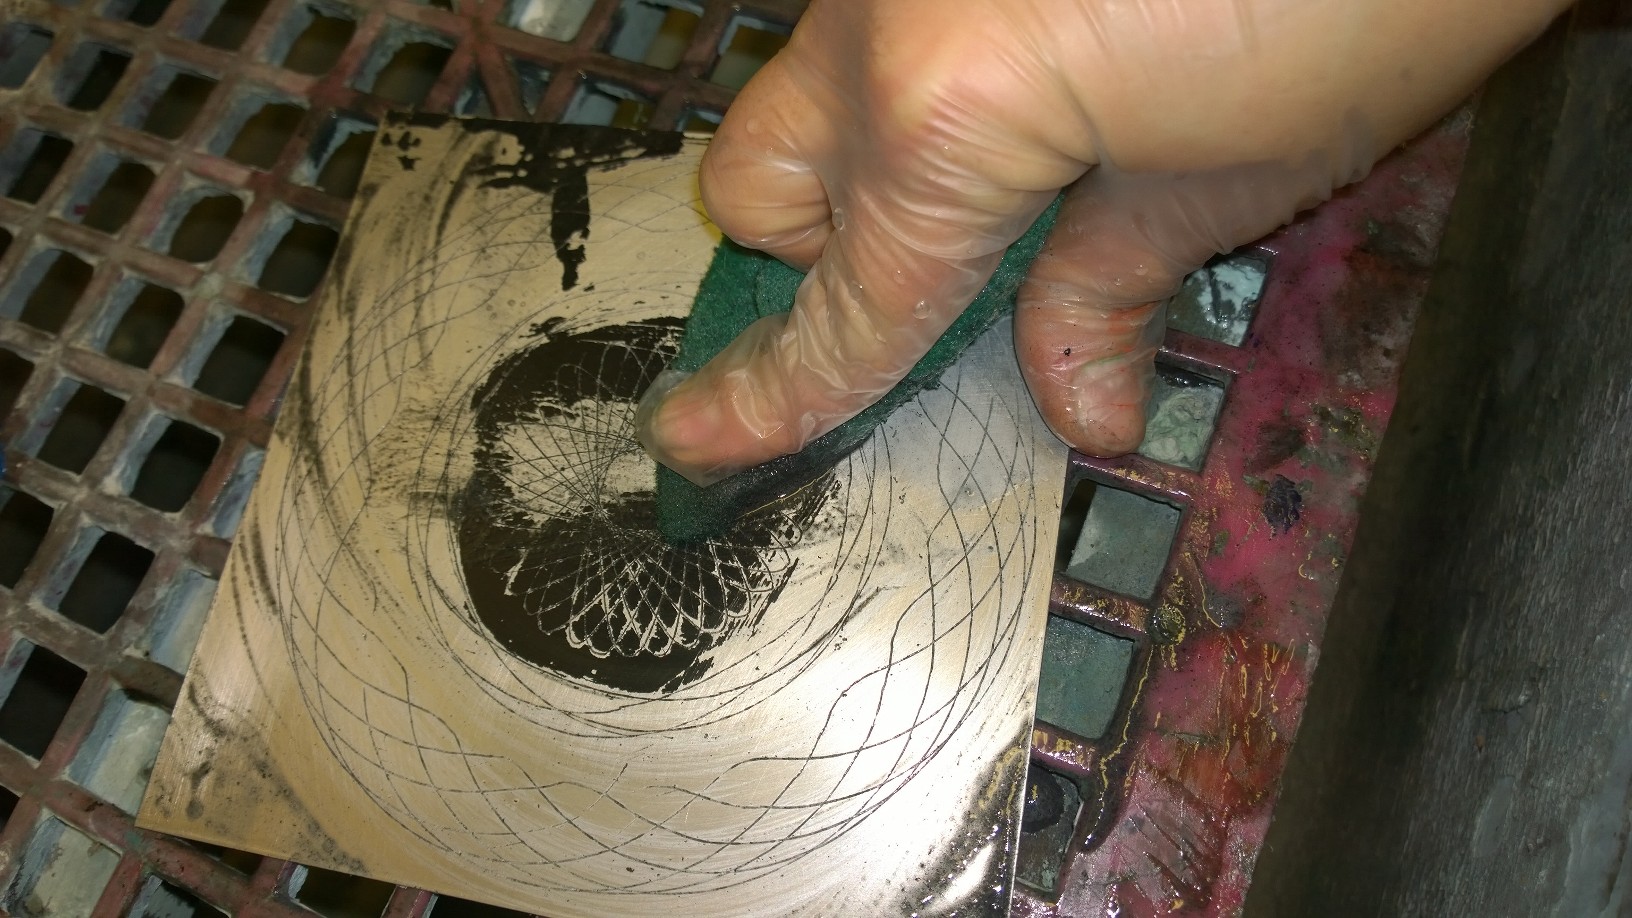
- When finished etching the plate, thoroughly rinse front and back under cool running water. Mop up any ferric chloride (or copper sulfate) spills with sodium carbonate and water.
Electro-Etching
"The basis of electro-etching: a simplified explanation" by Alfonso Crujera & Bob Perkin, 2015.
This article presents some of the underlying ideas and terminology connected with electro-etching. It is not crucial to understand these principles in order to produce successful etchings. However, we believe that by presenting a simplified explanation, it may remove some of the mystery of the technique and assist in encouraging its wider use.
Hard & Soft Grounds
Traditional Etching Grounds and their Health Hazards
Breathing high vapor concentrations of this product may result in mild depression, convulsions, loss of consciousness, or lung damage. (extract from MSDS). Traditional hard ground solutions often contain Naptha and Asphaltum. Such products may also contain PAH (Polycyclic aromatic hydrocarbon), known carcinogens. Solid hard and soft ground compositions ('ball ground') for roll-on contain asphaltum and coal tar pitch. The cancer risk is exacerbated by heating on hot plates and the use of mineral spirites for clean up.
Safer Etching Grounds
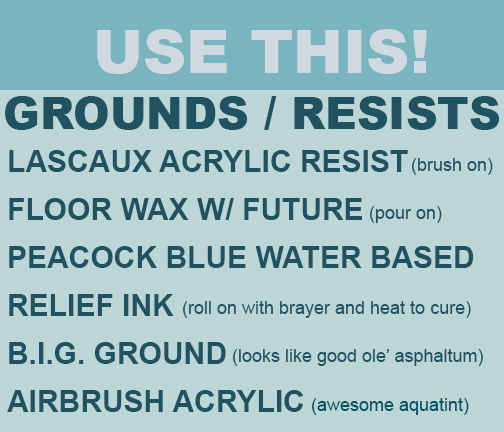
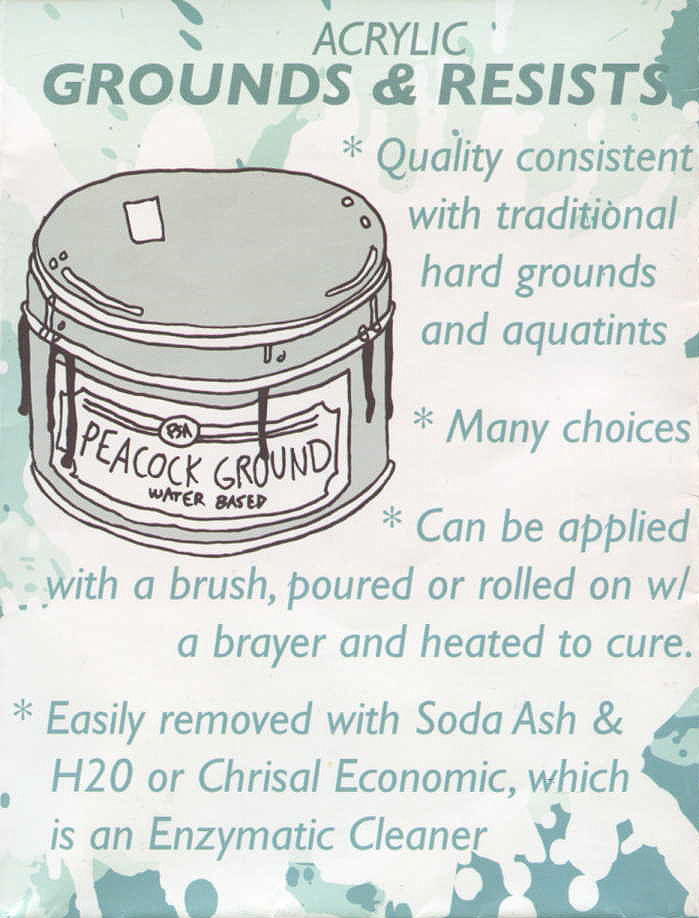
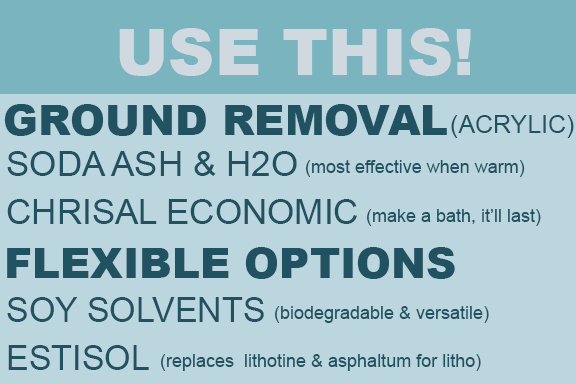
On nontoxicprint.com, many references are made to acrylic grounds such as Z*acryl and Lascaux. The Lascaux resist products also may be quite expensive.
The new, seemingly more promising direction for alternative grounds is ink-based grounds. We tested BIG (Baldwin's Ink Ground) and "New Blue" ground, developed by Gerald Ferstman of University of Kentucky. Both BIG and the materials to mix "New Blue" ground are available in the intaglio studio for you to try. Ferstman and Mark Graver are working on an improved ink ground that should be available soon.
Safer Alternative Etching Ground : BIG (Baldwin Intaglio Ground)
There are many alternatives to the traditional etching ground on the market, many of which advertise themselves as the safer alternative. This may be the case but from others experience this is often to the detriment of quality and practicality. This common problem has put many printmakers off from trying alternatives, preferring to stay with the reliable time honored system. Did you know that a traditional etching ground contains arsenic, lead, mercury to name but a few toxic elements which can not only be breathed in through your air ways but also absorbed through your skin. With BIG provides a non toxic alternative but also a ground which is far more versatile.
Because the main constituent of BIG is an ink, it allows the artist printmaker to experiment with many different effects on their etching plate. Techniques ranging from soft and hard ground, photo etching, marbling, relief etching, sandpaper aquatints and coffee lift are but a few which can be explored.
BIG has been used at the School of Art University of Aberystwyth since 2002 and has been adopted in many other private and educational print workshops around the world. Andrew Baldwin has a long established career in printmaking, stemming from a family tradition of printers. When Andrew joined the Art Department of the University of Aberystwyth, printmaking processes were traditional and included the use of dangerous chemicals. Intending to reduce these hazards, Andrew attended a nontoxic workshop at Edinburgh Printmakers. Inspired by the possibilities he had seen, in 2000 Andrew began his own research into developing a safer alternative. Out of this research emerged a more versatile, safer etching ground, now known as BIG (Baldwin’s Intaglio Ground). The ground and the many safer alternative processes have since become successful alternatives to the traditional methods in workshops around the world. At present, there are many Universities in Britain, Canada, USA, New Zealand and Australia using BIG as their preferred safer etching ground. Andrew has established himself as a successful printmaker in his own right, earning titles such as Welsh Artist Printmaker of the Year 2007 and Most Exceptional Artist at the Federation of British Printmaking exhibition. He has exhibited widely in Britain, Australia, Canada, Hong Kong and the USA.
A step by step guide to using BIG Etching Ground
1. Bevel the edge of the plate, not only for conventional reasons but also to preserve your roller.
2. Degrease the plate (using either soy sauce or salt vinegar water mix and a little whiting as this is a healthier option) making sure all deposits of whiting are removed from both sides of the plate when drying it. (Don't dry with a hair dryer as some water systems have quite a lot of chlorine, which can be left on the surface of the plate, use newsprint or equivalent). Thorough degreasing is very important in order that BIG adheres to the plate.
3. The secret to a successful application of the BIG ground is to roll the plate up evenly and not too heavily. Squeeze a small amount of the ground onto a glass pallet. Spread it out with a pallet knife and roll it up (a good quality brayer or roller helps). Pass the loaded roller over the plate in a fairly vigorous fashion. At first the plate will take on a sort of eggshell appearance. Occasionally spin the roller to give an even coverage of ground. *
4. At this stage you can treat the ground in the same way as you would a soft ground. **If however you wish to create a hard ground you must now bake the plate. (The ideal method is to do this in an oven, but a hot plate will do. It is also possible to use a cardboard box with a round hole cut out of the top to which a hairdryer can be inserted, blowing hot air onto the plate. This latter process is a simple one but can take a little longer to bake the plate. The timing for baking will be dependent on the size of your box and the strength of the hairdryer.) With each of these methods it is important to keep the dust levels low. It is equally important that the temperature and the length of baking time are correct relative to each other, as although the ground would perform well at the initial stages, problems may arise when removing the ground if the temperature has been set too high for too long. As a benchmark, a temperature of 275F (135C) for 6 mins works well, but of course you can increase the temperature and reduce the time slightly if you wish. Just be aware that too high a temperature will burn the ground. This will be indicated when smoke rises from the plate and the color of the ground changes. To assess whether the plate is dry or not, first let the plate cool down, as while the plate is still hot the ground remains tacky.
BIG used with Block Out if heated will flake. Do not heat Block Out with BIG. When baking the plate, test the tackiness by quickly touching the plate and if it is slightly tacky, then it is good to pull off the heat. If it is dry-baked for too long, it may flake and will be harder to remove.
5. You should now have a perfect working ground. Unlike traditional grounds BIG will retain its quality indefintely and will not dry out. It is also possible to draw preliminary sketches on the surface of the ground using a soft pencil; or you can use a litho pencil No. 1 or conte paper. If you accidentally scratch the plate you can use a permanent marker pen or block out (see above) to cover the marks, or alternatively, apply BIG stop out. It is important to allow the ground to cure for at least half an hour after cooling before you bite the plate. Ferric should be between 33 and 38 Baume.
6. To remove the ground, it is easiest and most enviromentally friendly to use EZ Strip. Then let the EZ Strip sit for 2 - 4 minutes, the EZ Strip with change to a pink/purplesh colour then you can remove it with a shop towel or rag. Remember, if removing the ground proves difficult you have probably baked the plate for too long. Alternatively you can use citrosolve however it takes more time and effort.
Removing BIG
- EZ Strip - the easiest and the most environment friendly. Let it sit for 2-4 mins before removing. The EZ Strip will turn slightly pink/purplish colour and can be seen start to lift off the BIG.
- Citrosolve - takes the most time and effort to remove BIG.
- Block Out - Floor Wax + India Ink ⭱ if heated too long, it flakes. Washes off with soap and hot water.
*If at stage three you are covering an earlier etched plate, roll the plate up with a little more ground than you would for a bare unetched plate. Then with your finger work the ground down into the etched lines. When you are happy that this has been achieved you can then strip back some of the ground with a dry roller.
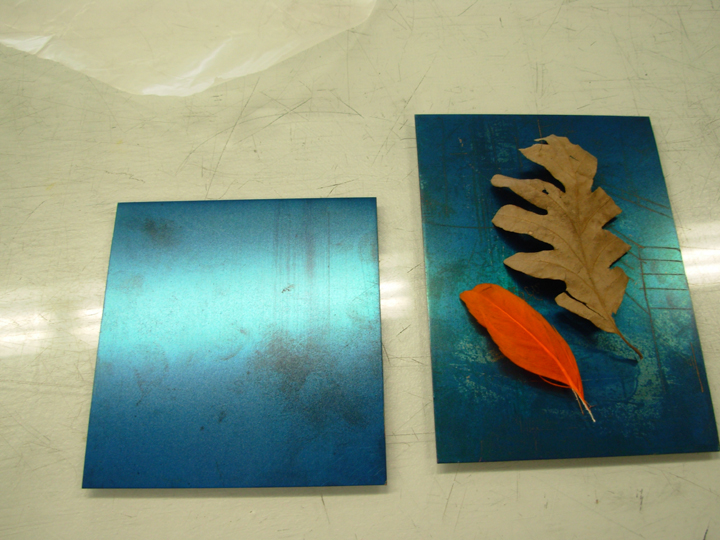
**If you want to use BIG as a soft ground to create impressions of leaves, feathers etc., tape a sheet of screen printing mesh larger than your plate to the bed of your press. After coating the plate with wet ground register the plate under the mesh and run it through the press (two etching blankets are usually sufficient). A small amount of ground will be removed onto the mesh. Re apply the ground to the plate, place items on top and run through the press making sure you have placed the plate in the same position with the mesh dropped on top. Then, by baking the plate you can combine soft and hard ground techniques, if you wish, on the same ground.
Use of BIG etching ground
BIG is used by Zea Mays studio in Western Massachusetts and by Mixit Studio in Somerville, MS; both swear by it. Beware the MSDS: it is certainly less toxic, but not non toxic. There is a video explaining soft ground application included in the materials here; on the BIG website, you will find a video explaining hard ground application. Zea Mays' notes on soft ground application suggest heating the plate: I did not find this step necessary, nor does Andrew Baldwin recommend it. BIG difficult to remove, even with strong Estisol.
One thing we came across with the ink grounds is that because they roll on, in a second etch, they do not stop out the first etched lines. Here is the advice from Andrew Baldwin. The same technique could be applied with New Blue:
"If you are covering already etched lines, first using a piece of mount card or similar, skim some ground over the plate. This is the same approach many use when inking up a plate to print, before wiping back. After you have carried out this stage you then use your dry roller to strip back some of the ground on the plate. Periodically remove some of the ground from the roller if required by stripping it on some clean glass until the ground has the standard depth on the plate. It is worth mentioning that if you have under etched your plate, by covering the plate with ground with the roller this will allow you to etch the lines more deeply."
Some printmakers will simply smudge the ground with their finger into the etched lines to protect them from further etching.
Soy Wax Litho Ink Soft Ground
This ground was introduced into the Zea Mays Printmaking studio in 2015 by Marnix Everaert of the Academy of Fine Arts, in Ghent, Belgium. He suggests that the ground be etched in a low concentration of ferric chloride (12.5 degrees Baume) due to the ground’s delicate nature.
Materials:
- Soy wax
- Graphic Chemical Senefelder’s Crayon Black Lithographic Ink/oil-based stiff litho ink
- Metal can
- Paint brush
- Brayer
- Newsprint
- Hot plate (+ table top thermometer)
- Degreased copper plate
Mixing:
1. Set hot plate to reach 110 degrees (table top thermometer will confirm heat).
2. Add a mixture of 45% ink and 55% soy wax to a metal can. **See tips section for mixing soft ground using a digital scale.
3. Place can, with contents on hot plate and let contents begin to melt.
4. Once contents have begun to melt, use a paint brush to mix the ingredients together. Consistency of the mixture should not be too thin - if it is too liquid, slightly lower heat on hot plate.
5. When melted, the consistency of the soft ground should be like thick oil -> the drip from the brush should be slow.
Applying:
1. Warm a degreased copper plate (newsprint underneath) on top of the hot plate, set at 110 degrees.
2. Brush a small amount of melted ground solution on to the copper plate surface.
3. With a brayer, roll out the thick liquid ground. Cover the plate surface completely with an even, thin coating: if the surface of the plate resembles an orange peal, the ground is too thick; if any copper sheen is visible through the ground, it is too thin.
4. Once the plate is rolled up with soft ground, remove it from the hot plate. The ground will start to visibly dry immediately, turning from a glossy finish to matte finish.
5. Allow to cool for 5 - 10 minutes, then transfer your imagery to the plate surface.
6. Open time for using your grounded plate is unlimited; you can freeze coated plates to harden for storage.
7. To redo a soft ground plate, just warm the plate on the hot plate to melt and re-roll the ground.
8. To clean ground from plate, heat the plate on the hot plate to melt ground and remove it using a rag.
Tips:
*In mixing the ingredients for the ground, the ratio of soy wax to litho ink = 1.2
Use the following formula to determine the correct amounts to mix:
_____ gms ink x 1.2 = _____soy wax
Place can on digital scale and “0”. Add ink to can, read number/weight on scale. Multiply that number by 1.2 to get the amount of soy wax needed for ground. With can on scale, reset scale to zero and add the soy wax to the can, until you get the required weight.
*Store the ground in the can with brush. It will harden and can be reheated to use again.
*You can also pour the liquid soft ground into a silicone ice-cube tray and let cool. These “balls” can be removed and wrapped in plastic. Inserting a toothpick into the soft ground before it cools (like a popsicle), makes it easier to remove the ground from the tray and apply onto the copper.
Other Grounds: Acrylic Grounds
For your consideration, from an article titled "Safe and Safer" (2004) by Ad Stijnman:
"One of the forerunners in the development of acrylic etching grounds is the American Mark Zaffron around 1995. Others experimented with commercially available acrylic binders, floor varnishes and acrylic relief printing inks. The idea behind using acrylic grounds is not exactly clear. It is said that they replace liquid classical ground with their aggressive volatile solvents. Another argument is that the asphaltum in the classical ground is carcinogenic. So it is, if you eat it or rub your skin with it regularly. But when rolling up ball ground onto a heated plate it should not smoke or burn, melting is enough and that is harmless. The other way around, liquid acrylic grounds contain a few percent of paint thinner and ammonia. These evaporate during drying and even more when the grounds are "baked" to harden them. Only few people comment on that, most people seem to take for granted that acrylics are "safe", which they are not."
Keep in mind Stijnman is addressing ball-grounds, not liquid grounds, and the carcinogens are released into the air when the ground is heated (also, they can seep through your skin). The MSDS for ball ground does not look too harrowing, but the information is also rather sparse
Acrylic Hard Ground Solutions
After twenty years of testing, development, peer review and refinement, safer printmaking research of etching grounds continues. More suppliers and manufacturers will continue to offer their own range of “nontoxic” products for the various applications in printmaking, due to the increasing interest in safer methods, as well as new VOC regulations. The unique qualities of traditional line etching can easily be obtained through contemporary methods and materials, and without exposure to neurotoxic and carcinogenic fumes. There is little doubt that the old resists carry significant risks.
There are currently several custom developed acrylic hard grounds on the market, such as: Z*ACRYL Hard Ground Solution and LASCAUX Hard Resist. The suppliers' websites provide detailed specifications and usage instructions. Both products can be regarded as safe to use, and deliver professional results on all metals. These innovative acrylic grounds are recommended as a replacement for the traditional tar-based products (solutions and ball grounds) with their dizzying odors and carcinogenic potential. Note: Acrylic emulsions made for domestic use as floor polish (KLEAR).
Acrylic Hard Grounds:
- Liquid Hard Ground - floor polish
- Lascaux hard resist
- Z*Acryl Hard ground Emulsion
- Spray on hard grounds - can be sprayed onto the plate like an aquatint using an airbrush and a compressor. Floor wax with India ink can be used as well as the Z*Acryl Liquid hard ground
Acrylic Soft Grounds:
- Orono soft ground
- Lascaux soft resist
Aquatints
Hazards of Traditional Aquatints
Traditional aquatint rosin is explosive; several fires in art schools were reported as being due to Aquatint box explosions. The fire hazard is often exacerbated by metal bearings in the rosin box, and the use of a naked flame for melting the rosin dust particles onto a plate. Rosin dust is allergenic, i.e. it is known to cause asthma and is suspected of permanently clogging lung tissue. Heated rosin is also used as solder flux in the electronics industry. The fumes generated may cause bronchial inflammation. Many art schools and print shops still practice traditional rosin based aquatint with minimal precautions.Airbrush Aquatint Process
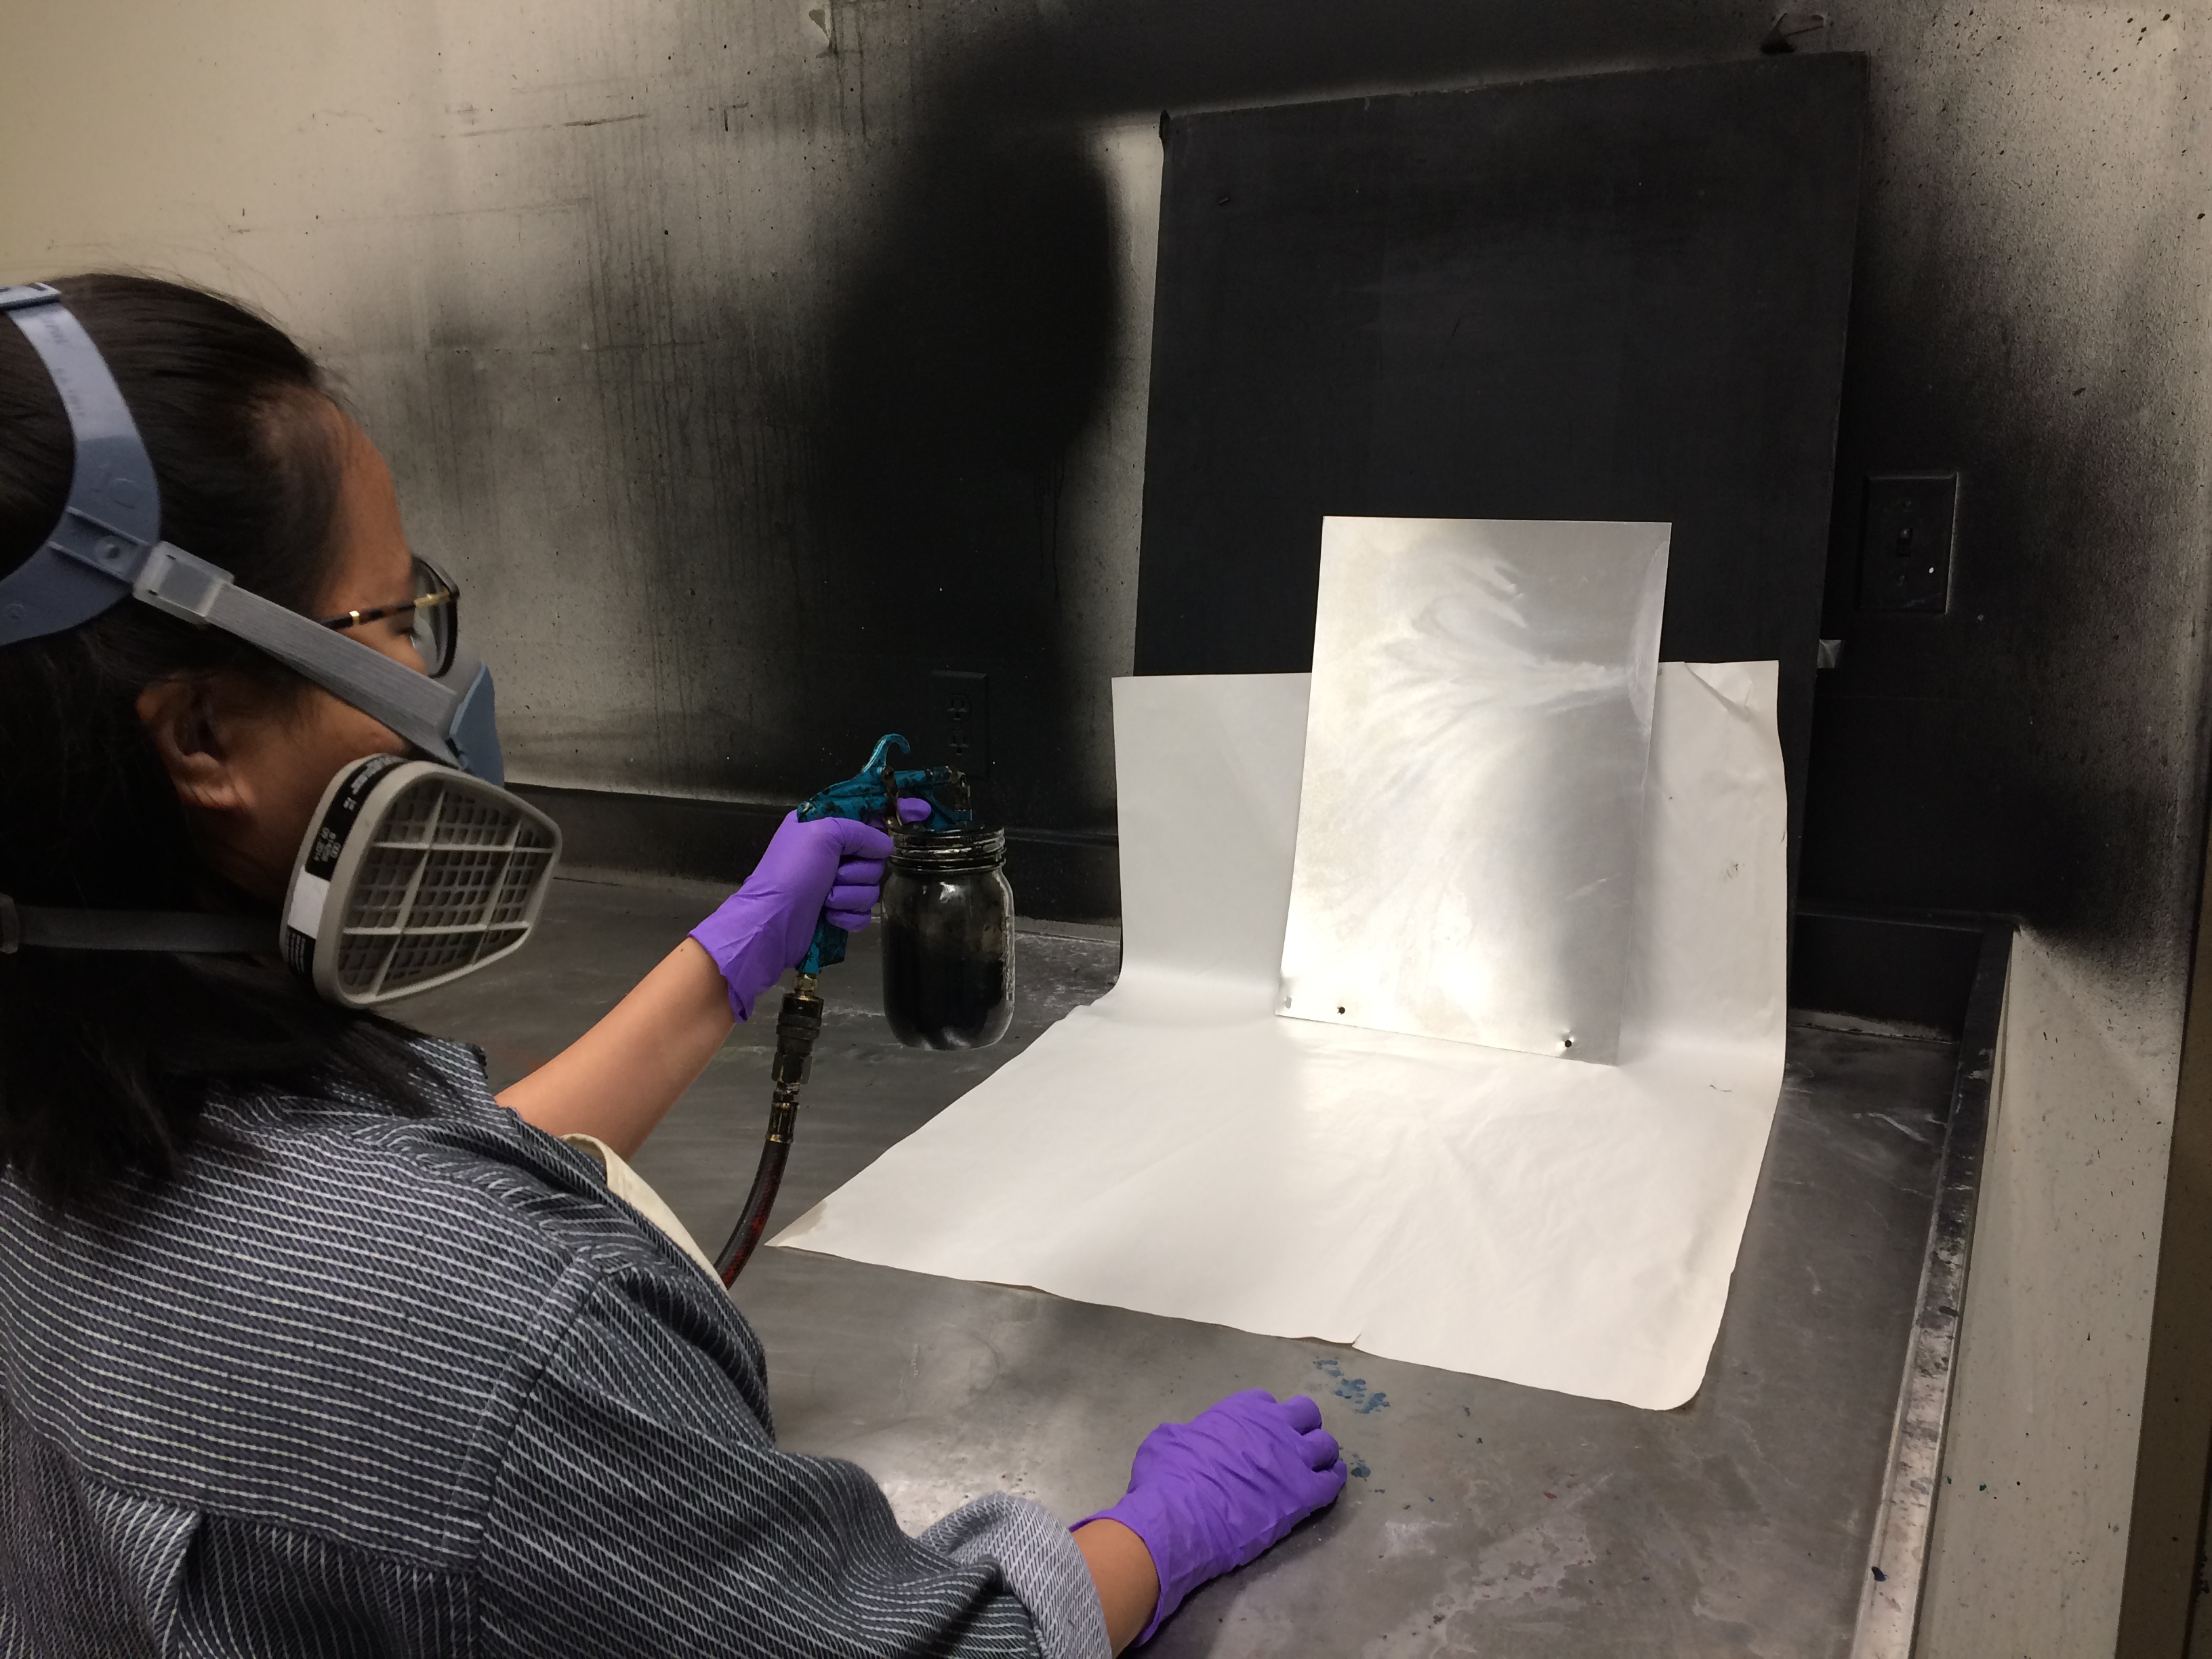
SUPPLIES
- Badger Acrylic Aquatint Solution
- India ink
- sheets of newsprint for test spraying
- degreased plate (not sanded)
- bowl of soapy water/ paper towels (for removal of optional grease marks)
- Pour acrylic aquatint solution into detachable airbrush jar.
- Add India ink to acrylic medium (for tinting) until mixture is dark.
- Add 20% water to acrylic/India ink mixture
- Attach jar with mixture to airbrush.
- Open air-line/compressor.
- Use respirator, googles and gloves. Take plate and air-line hose into spray booth.
- Test spray density on white paper (about 40% to 50% dots) you are looking for a FINE MIST of black dots. Once satisfied with the result on paper, spray onto your plate
- Spray in even passes. Do not overspray as the plate will not etch if covered too thickly with dots.
- For a base aquatint, aim for a density of dots that will cover between 40% to 50% (not more than 50%) of the plate surface. (*Aim for a FINE MIST OF DOTS not a total covering).
- OPTION: Create marks on top of the aquatinted plate with Crisco, oil crayon, Scotch tape or acrylics; during etching these marks will remain lighter in tone. You may create successive layers of tone all the way from white via various layers of grey to black according to how long you etch the plate. You can create a whole tonal range in one etching stage simply by varying the density of the sprayed dots. You can also make blends, graffiti marks and stencil effects this way.
- OPTION: Or try dissolving some of the sprayed plate surface with water; you will get amazing random wash effects. After etching, any fatty deposits (Crisco or oil crayon) need to be washed off with soapy water.
Aquatint solutions mimic the dots found in a conventional aquatint. To see dots of aquatint spray, mix India Ink (ideally Koh-i-Noor) into an acrylic aquatint solution - use enough ink to get a black, and test on paper. The sprayed plate should be evenly covered in fine acrylic dots.
Spray Aquatint (mixture options)
- Use ready-mixed Badger Aquatint Solution for the best corrosion resistance on any metal and a traditional "dotty" look; available from Polymetaal. The Badger solution is based on a very tough polymer which is not semi-permeable like Speedball.
- Or use Lascaux Aquatint Solution with Koh-i-Noor 3080-4 ink. Mix one of the following binders Lascaux 2060 (or Golden GAC 100) with Koh-i-Noor ink, then with 20% to 30% water; excellent corrosion resistance and easy to strip.
- Or add some Koh-i-Noor 3080-4 ink to Z*Acryl hard ground emulsion to obtain a black aquatint spray. The solution is liquid enough to be sprayed without further dilution, does not tend to clog the airbrush nozzle, and yields good results with all metal salt etching methods. The black dots are clearly visible, making spraying more reliable. Most other acrylics that are typically used for aquatint applications require dilution prior to use. Mix one of the following binders Lascaux 2060 (or Golden GAC 100) with Koh-i-Noor black ink, then with 20% to 30% water; excellent corrosion resistance and easy to strip.
- Or use Speedball Screenfiller (semi-permeable). Mix SpeedballScreenFiller with 20% to 30% water. This yields the most velvety tones, and works best on copper. Mix one of the following binders Lascaux 2060(or Golden GAC 100) with Koh-i-Noor black ink, then with 20% to 30% water; excellent corrosion resistance and easy to strip.
Use clean water to dilute the aquatint spray solution
Spray Aquatint Equipment
- airbrush compressor
- spray gun / designer's airbrush
Supplies
- sheets of newsprint for test spraying
- a bowl of soapy water
- paper towels
- degreased plate (not sanded)
- pin / needle / pipe cleaners (for cleaning spray gun blockages)
SAFETY NOTE: Protect yourself against low level VOC exposure!
- Today there are many paint products that are marketed as ‘safe’, yet there may still be harmful low-level VOC emissions, such as glycol ether. Examples: many water-based paints, acrylic floor finish, some artist acrylics, low odor, low VOC solvents, and printmaking resists.
- Use a full organic respirator or a disposable light weight mask that offers some organic vapor protection. Dispose of the mask after a day’s work.
- Product example: 3M™ Particulate Respirator 8514, N95, with Nuisance Level Organic Vapor Relief
Universal Aquatint Solution
Simply add some Koh-i-Noor 3080-4 ink to Z*Acryl hard ground emulsion to obtain a black aquatint spray ink. The solution is liquid enough to be sprayed without further dilution, does not tend to clog the airbrush nozzle, and yields good results with all metal salt etching methods. The black dots are clearly visible, making spraying more reliable. Most other acrylics that are typically used for aquatint applications require dilution prior to use.
SPRAY AQUATINT METHOD
- Aquatint is often applied in addition to an initial hard ground layer (or afterwards)
- Attach the airbrush to the compressor and turn on the machine
- Make sure the facility's ventilation is running
- Put on gloves and goggles
- Fill the airbrush's detachable ink container with ink and re-attach
- Test spray density on white paper (about 40% to 50% dots) you are looking for a FINE MIST of black dots. Once satisfied with the result on paper, spray onto your plate
- Spray in even passes. Do not overspray as the plate will not etch if covered too thickly with dots
- Tip: If you don't have a spray booth, improvise by filling a spray mist bottle with thinned Z*Acryl hard ground and simply spritz the plate. The effect will be more speckled, but it works
MODIFIYING SPRAY AQUATINT WITH RESISTS (MASKING)
- Create block-out marks (or shapes) that will remain lighter in tone when etched. You may apply on top of the aquatinted plate Stop-out Solution, litho crayon, oil crayon, Scotch tape or acrylics.
- You may create successive layers of tone all the way from white via various layers of grey to black according to how long you etch the plate.
- You can create a whole tonal range in one etching stage simply by varying the density of the sprayed dots.
- You can also create gradated blends, graffiti marks and stencil effects this way.
- Or try dissolving some of the sprayed plate surface with Citra Solve, Easy Strip, etc. for random wash effects.
- The spray aquatint may also be left in the plate for printing
REMOVING ACRYLIC AQUATINT
- Acrylic spray aquatint can be stripped using a citrus-based solvent D*Solve (by Z*Acryl) Citrus Solve or Easy Strip
- Acrylic aquatint can also be stripped off in a strong soda ash solution (1 part crystals to 3 parts warm water)
- "D*Solve is a truly revolutionary solvent was formulated as an alternative to petroleum-based turpentines and thinners. It is made from 100% renewable agricultural resources of soy, corn, and citrus, and is non-polluting, non-carcinogenic, and bio-degradable. Less than a teaspoon will thoroughly clean a large plate. DSolve will even strip dried ink from etched lines." Dick Blick
REMOVING ACRYLIC STOP-OUT AND OTHER RESISTS
- After etching, remove any acrylic Stop-out solution with T.S.P. (Trisodium Phosphate Powder) cleaner
- Oily block-outs or masks (oil crayon) may be washed off with soapy water
Suggested etching times for Spray Aquatints are as follows:
Zinc etched in Saline Sulfate Etch
- lightest grey.....................1 second
- grey.................................. another 5 seconds
- darker grey....................... another 20 seconds
- and so on up to black…… about 10 to 15 minutes
Copper etched in Edinburgh Etch
- lightest grey..................... 5 seconds
- grey.................................. another 20 seconds
- darker grey....................... another 60 seconds
- even darker gray.............. another 5 minutes
- and so on up to black...... about 30 to 45 minutes
CLEAN-UP
- Clean airbrush to prevent nozzle blockage. Detach jar with acrylic mixture & re-attach jar with soap and water. Spray soap/ water mixture into garbage can (or rag). Detach jar.
- Remove Acrylic medium aquatint from plate with Citrasolve (or Estisol 150). If this does not work try tsp (Trisodium phosphate), but make sure to wear nitrile gloves as it is an alkaline solution.
Acrylics can also be left on the plate for printing.
Carborundum Aquatints
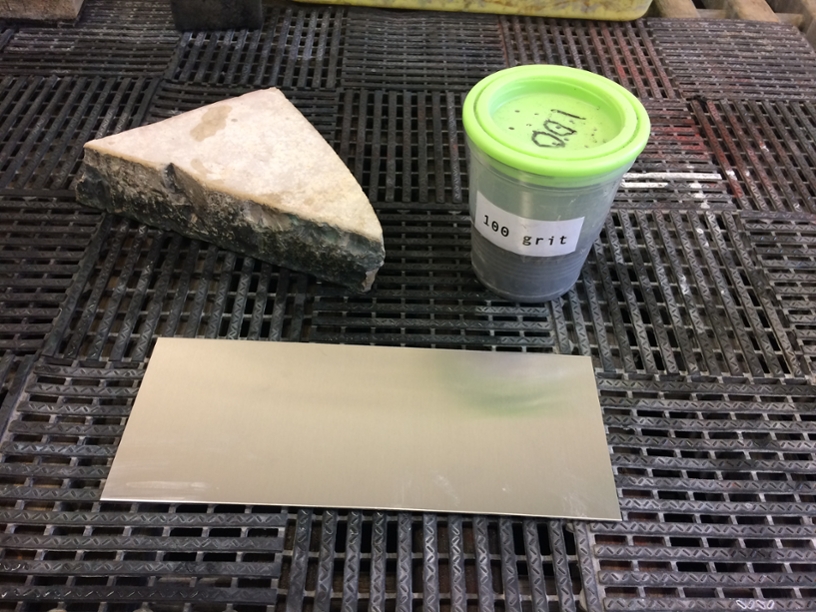
Materials
- Copper or Aluminum Plate
- Carborundum (80 or 100 grit)
- Levigator or small chunk of Litho stone
- Water and a sink to work on
PROCESS
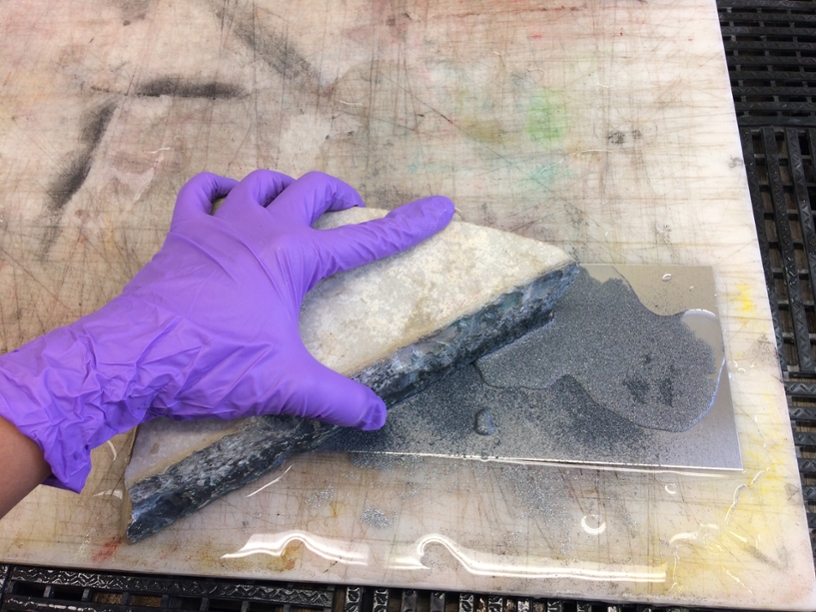
- Place plate on a non slip surface on top the sink. Wet plate with water and sprinkle a fair amount of carborundumon the plate. It is recommended to use the 80 grit on copper plates and 100 grit on aluminum plates.
- Scratch plate with carborundumusing a litho stone or a levigator. Try to evenly scratch the plate until the water looks milky.
- Rinse plate and check if the surface is evenly scratched. Repeat process several times to even out surface.
- Once the surface of the plate is evened out, pressure wash to remove remaining grits that are stuck on the plate.
*Note: The lower the number of the carborendum, the coarser it will be.
Carborundum is aluminum oxide grit #80
Silk Aquatints
Silk Aquatint (or Silk Mezzotint or Silk Collograph) is a versatile alternative intaglio printing technique that reproduces acrylic paint marks painted on a plate laminated with silkscreen mesh fabric. The painted image is produced as an additive process (comparable to the collagraph technique) and yields a beautiful range of tonalities like the traditional mezzotint. Silk Aquatint is a non-acid method of working a print plate where the image is created by painting with whitened acrylic medium on a black silk surface adhered on plate (or backed with plastic) to produce a variety of both tones and textures. Silk aquatint has the richness of mezzotint, the spontaneity of action painting, the vivacious surface of a palette knife impasto. The Plate is then inked, wiped (like a metal plate) and printed on an etching press. Plates are easy to cut and durable for large editions.
The final Silk Aquatint print has a distinctive quality that stands out from other printing processes due to the expressive facture of the paint medium (transparencies, layering, textures, brush marks, drippings. The resulting plates are intaglio printed through an etching press and can be printed with any type of ink including water-based ink (Akua Kolor and or Charbonnel Aqua Wash). Silk mezzotints provide artists the opportunity to work in large formats with little expense in plate cost and can produce multiple copies from a single plate. The use of water miscible inks in printing reduces the toxicity of the process and allows for the immediate change of colors in the print.
Making the Silk Aquatint Plate
Materials Needed
- Styrene plastic board
- Polyester mesh (mesh should be about 1/2 an inch larger than the Styrene plastic board)
- Black Acrylic paint
- Sponge brush
- Sand paper
- Water and mixing container
- Sharp blade for cutting
Preparation
- Sand the styrene plastic board lightly to give it a tooth for better adhesion.
- Clean the styrene plastic board of all dust with a damp lint free rag.
- Mix black acrylic with water to the consistency of milk. Adhering the silk mesh to the plate
- Lay the polyester mesh on top of the styrene plastic board. Place the mesh slightly askew in relation to the styrene plate. Make sure mesh is not parallel to the plate. This will prevent fraying around the edges on the plate. Keep polyester mesh wrinkle and dust free.
- With a sponge brush, apply black acrylic (mixed with water) on top of the mesh. Start at the center of the plate and paint outwards until the entire surface is black.
- Let the plate dry completely
- Trim excess mesh off the sides of the plate with an x-acto blade.
Creating the Image on the Plate
- Silk Aquatint Plate (follow instructions above for creating)
- White acrylic paint
- Gloss Medium
- Paint brushes and applicators for image making
- Water Mixing Containers
Preparation
- Prepare Mixture for Silk Aquatint Painting Medium as follows:
- 1 part white acrylic
- 5 parts acrylic medium
Painting on the Plate
- Simply paint prepared Silk Aquatint Paint Medium on the plate
- To avoid seeing brush strokes in the print, water down Silk Aquatint Painting Medium
- To produce lighter tones and show the white of the paper on the finished print build up the plate by layering the acrylic
- For best results, let the paint dry before adding each layer
Sandpaper Aquatints
Use prepared hard ground plate. Use emery paper/sandpaper to emboss multiple granular impressions onto plate surface to create aquatint surface. Position the fine emery/sandpaper face down on plate. Re-adjust the emery/sandpaper each pass to through the press to puncture different set of holes into the hard ground to create aquatint.
*NOTE: The lower grit rating of the sandpaper, the courser the sandpaper
For fine aquatint:
Re-position 500 grit (or 600) emery/sandpaper (pass through 10 times on press)
For courser aquatint:
Re-position courser 220 grit emery/sand paper (pass through 5 times on press)
For course aquatint:
Re-position course 120 grit emery/sandpaper (pass through 3 times on press)
TIP: For value graduation, use newsprint, stacked and stepped in layers to alter embossings of granular textures into hard ground.
Sugar Lift
Sugar Lift Recipe
- Corn Syrup - 90% of the recipe
- Foto flo - add just a little bit
- India Ink - a few drops to give a colour
Stop Out
This is an area that requires the most continued research. There are some good potentials out there that could replace the traditional asphaltum, but the most reliable seem to be the commercial acrylic stop-outs: Golden, Lascaux, Z*Acryl. These products are recommended by leaders in the field, so it is simply a matter of getting your hands on some and trying it out. The problem with home-made solutions is that consistency is difficult to maintain, as the products going into the formulas are not held to fine-arts standards. That said, here are some suggestions:
- BIG ground thinned with tack reducer and turpentine replacement
- Future floor wax with Sax Tempera Varnish (Quebec based manufacturer)
- Waxy or oily crayons (depending on what you are trying to achieve)
Photo-Intaglio
Photo-Intaglio was inherently developed as a safer alternative to traditional etching, since it does not use grounds or stop out. Indeed, many photo films are simply applied to the plate and not etched in acid at all. I did some looking into PurEtch, however, just to see how "pure" it really is. Jennifer Page (the distributor at Cape Fear Press) thinks it is safer than other films like ImageOn because it does not require thinning. The film does contain ammonia, so the vapors are harmful, even though touching the film is not. The MSDS is notably lacking in environmental hazard information, which is something to wonder about. In theory, the plastic polymers break down into monomers and do not cause a problem in the ecosystem. Plastic is plastic, however, and lasts forever. Not enough research has been done to know what, exactly, happens once acrylic-based print materials hit the waste system. The PH balancer , pure sodium carbonate, also called soda ashdeveloper is safe. Though a natural product and non-toxic, it is still strong--don't get the concentrate on your hands!
Another option to try, that does not involve applying a film at all, is solar-plate intaglio. This can be found here: Solarplate Etching, What is Solarplate, Troubleshooting.
Photo-Intaglio goals (Photoshop & Solar Plates)
To create original intaglio prints using photo-Intaglio processes by converting continuous tone or line images from photographs, drawings or digital manipulation into a printable format. The emphasis will be to create unique prints that are not reproductions from another medium.
Ways of creating Photo-Intaglio Transparencies
1. Photoshop is used to output a high quality half tone laser transparency in Photoshop to be placed on the emulsion.
2. Alternatively, you can expose the plate with a random dot aquatint screen before exposing a non-adjusted transparent positive (with india ink drawings on transparencies) This accomplishes the greying down at the exposure stage instead of in the transparency itself.
**See Demos on Youtube ...Puretch Photopolymer for Photo Etching & PCB Demo #1
or for printing a photopolymer plate http://youtu.be/rmRT645LswQ
For polymer photo-Intaglio, the screen frequency works best at 300 dpi for polymer emulsion to develop correctly.
BASIC SOLAR PLATE PROCESS STEPS OUTLINED
1. The transparency (with the image side face down, emulsion to emulsion) is placed on the laminated plate and exposed to UV light.
2. The UV light hardens the emulsion in the non-image areas.
3. The plate is developed in a water mixture by washing away the non-hardened/exposed image areas, the image is revealed as a collection of dots from the halftone, like aquatint to render a full tonal range.
4. The plate is etched, and the dots are bitten into the plate to retain ink as an intaglio plate. Inked plate is printed on a press.
Preparing positive digital transparencies for photo-Intaglio
In making a film positive in preparation for using Solar plates, the idea is to grey down the original image so that black areas become fields of random dots which transfer to the photopolymer surface during exposure. These dots hold the ink in much the same way as an aquatinted plate does. The inked dots produce, in the printed image, varying shades of grey to black depending on how close the dots are to each other. Areas that you wish to make a solid colour in the printed image should be turned into approximately 60% random dots on the transparency. The following are instructions as to how to do this in PhotoShop. (Adjust them as needed.)
Photo Intaglio Plates
The solar plate is a photo intaglio medium that allows for a wide range of value and fine detail. It is a positive plate, meaning whatever is black on your transparency will be black on your print. The plate is light sensitive, and before exposure, it should be stored in the darkroom or in a doubled up garbage bag. It can be developed in the darkroom or out in the printmaking studio.
Sourcing Images
- With all photo printmaking techniques, the final printed image will only be good as the images that you started with. If you are working with scanned photos, negatives, etc. you want to have a high resolution image to start from.
- We recommend at least 300 dpi if the image is going to stay at the same size.
- If you are enlarging your image, go with 400 to 500 dpi.
- The scanner in the digital studio can scan both images on paper and transparencies, including photo negatives.
- Most images intended to be shown on a computer screen or online have a resolution of 72 dpi which is too low to print out clearly. If you are incorporating images found online, try to find high resolution images to work with.
Drawn Images
Photographic images don⫱t necessarily have to be used for the polymer plates. Hand drawn images can be scanned and printed out onto transparencies. You can experiment with drawing on mylar and directly exposing it onto the plate. Just remember that the drawing material that you are using must be photo opaque i.e. block out light.
- Some of the drawing materials that you can use.
- Staedtler Lumocolor Permanent markers
- litho crayons
- India ink mixed with floor wax
- black acrylic paint
Printing Images
- You cannot use regular mylar in the printer- the ink will never dry and you'll end up with a smudged, blurry image that will get ink on everything it comes in contact with.
- Essentially you are exposing an aquatint onto the plate, so that the surface of the plate has a texture that will hold ink. There are two ways to print your image to achieve this. Print your image as a greyscale and/or use an aquatint screen during exposure.
To create photopolymer transparency in Photoshop
- Scan or start with an image of approximately 300 dpi or more. If you are starting with an image which is smaller than your print image, increase the resolution proportionately when you scan.
- Go to IMAGE menu, Choose Mode: Grayscale. Then make any desired changes to image. It is usually best to have a wide range of tones from white to black. (Optional: CURVES or LEVELS can be used to adjust your image. I recommend lightening dark greys as they tend to print on the dark side.)
- Go to IMAGE menu. Set image size that you want your film positive image to be (usually a tiny bit larger than your plate). Set resolution at least 300dpi. Save as a TIFF file.
- Go to IMAGE: Adjustments: curves: set black end of graph to 60% and white end to 0-2%. If you want highlights white, leave white end of curve at 0.
- Go to IMAGE menu, choose mode - bitmap. A box will appear. Select 300 dpi bitmap. Choose diffusion dither. (This produces the random dot pattern). Save as a TIFF file. Stick with defaults for subsequent choices.
- Take (disc or memory stick) for output by an imaging company with an Imagesetter (by which a transparent film of the image is made). You can try printing a transparency yourself but you might need to adjust these instructions as needed. (If you print your own, make sure that the transparent material that you use is not UV blocking but that the image is.) The overall printed image should be a pale image of the original. Dots must be opaque!
If you are thinking about getting a bunch done using an Imagesetter, try ⫑ganging⫱ some images on one canvas (resolution 300 dpi) to save money. Set the separate image sizes and give them all the same resolution of 300 dpi before assembling on the canvas. (i.e. Do steps 1-3 with each image before assembling on one canvas.) After assembling, flatten Image (under Layer) and save as a TIFF. Once they are all together, treat as one image and continue to step 4. [As each computer screen is different, you are best to do a test on the smallest size available before submitting a large file.]
Aquatint Screen
An aquatint screen is a random dot pattern printed onto a transparency that imitates the dot pattern of the aquatint we have done in etching with spray enamel. The screen is quite expensive and can be easily damaged if not handled properly. It will be kept in the office and can only be used when I⫱m around the studio.
Exposure
The light sensitive top surface of the plate is protected by a layer of mylar. Remove the mylar and center the plate face up on the vacuum frame. The printed transparency is placed printed side down onto the plate. Lower and clamp the lid of the vacuum frame and turn on the pump with the silver switch on the back left side of the table. Once all the air has been sucked out of the frame, pull the release on the left side to rotate the frame to an upright position. The vacuum table stays on during for the entire duration of the exposure. Position the exposure unit to the mark on the floor. Once the exposure is finished and the light is off, you can rotate the frame back to a horizontal position and shut off the pump.
****The exposure amounts are as follows:
BITMAP (single exposure) = 350 light units
AQUATINT AND GREYSCALE IMAGE (double exposure)*
- Aquatint screen: 200 light units
- Greyscale image: 350 light units
*There are two separate exposures, the aquatint screen followed by the grey scale image.
DRAWN IMAGE (double exposure)*
- Aquatint screen: 200 light units
- Drawn image: 350 light units
* Again there are two separate exposures. It might take a bit to work out the exposure amount for the drawn image.
Developing
- Please wear gloves.
- Once the plate is exposed, it can be placed in a tray of lukewarm tap water.
- Let the plate sit for about one minute and then gently agitate the plate for about another 5 minutes with your hand.
- After the image is fully developed, thoroughly rinse the plate. Gently blot the plate with newsprint.
- Any water left standing on the plate will damage the surface. Post bake the plate for another 300 light units.
- Leave the plate overnight to cure properly before printing.
Printing
There is no need to etch your plate in the chemical bath-once your plate is developed and left overnight you can start printing. You can ink directly onto the surface of the plate. You may want to increase printing pressure a bit, since the plate is thinner than the regular etching plate. The plates can be cleaned with mineral oil followed by water and vinegar to degrease.
Inks & Modifiers
Qualities
Inks
The debate is out in the non-toxic printmaking world whether traditional oil-based inks are "toxic" or not. The matter is subjective because the term "non-toxic" is relative. In actuality, there is no such thing as completely non-toxic printing. The primary concern around inks is the necessity in the past of cleaning them with solvents. With the advent of vegetable cleaning agents (VCA), solvents are no longer necessary at all.
A look at the MSDS sheets for Graphic Chemical inks will help you decide for yourself: while the inks may be linseed oil based (not petroleum), the pigments and solvents used in the inks can be frightening. Often, pigments involve heavy metals. Inks like Akua water-based not only wash up with soap and water, they have also been thoroughly researched to contain only the safest, most stable pigments.
Quite a few oil-based inks that can be cleaned with soap and water have been developed in the last several years including: Charbonnel Aquawash, Faust Aqualine, Caligo SafeWash, and Hawthorn stay-open vegetable inks, to name a few. Charbonnel has excellent reviews from printmakers who are hesitant to give up traditional inks. Indeed, it smells like traditional ink, so if you are sensitive to linseed oil, this ink is not recommended.
Akua is often the ink of choice for many printmakers. They find that this water based and soya based ink is looser and more transparent than traditional inks, but overall they were very accepting of them. The looseness and transparency can both be adjusted. Another benifit of Akua is that it makes for an easy clean up. For monoprints, try Akua Kolor.
Caligo water based relief ink also has had good reviews (it worked well on a letterpress). Another option besides Caligo and Akua include Hawthorn inks.
Water Based Inks
In the following notes, you will find detailed information and testing results for Akua, Caligo, and Hawthorn inks.
- Photo-Intaglio wipe very quickly and easily. A few swipes with a tarlatan to remove the majority of the ink, plus careful paper wiping to control plate tone is all it takes.
- Hand wiping is rarely needed with Akua, and is not recommended because though the inks are safer than traditional inks, they do still contain pigments that can leech in through the skin.
- If desired, try wiping your paper down evenly with a damp sponge and then lightly blotting, rather than dipping it in the water bath. Paper needs to be barely damp to print well.
- All of the techniques and effects you use or obtain through oil based ink transfer to Akua. A little adjustment is all it takes, but you should not have to compromise the quality of your print.
- Akua makes metallic inks. They are best mixed with other inks to give them a metallic sheen. For surface rolls, mix the ink and roll up as you normally would. Follow with a roll of lift agent. The lift agent cannot be seen but helps the ink transfer to the paper. For intaglio, card the ink on, scrape it off, and before you move on to tarlatan and cleaning up plate tone, card on some lift agent. Let it sit for about a minute and then proceed with wiping. The lift agent is slippery and wiping will go quickly (the ink, however, will NOT wipe out of your lines, unless you seriously over-wipe).
Soya & Gum Based Ink
Oil Based Inks
Hawthorn Brand Linseed-oil Inks
In our first round of research in 2010, we discovered this British brand of ink that is vegetable oil based and can be used for lithography, relief, and etching. We tested it in letterpress and etching. The colors are spectacular and it is very easy to work with. Two downsides: cobalt drier needs to be added in order to quicken drying time (if you deem it necessary), and cobalt is toxic. The other is that though the ink claims to clean up with dish soap and water, it does not. It takes something a little tougher, such as Estisol. This is not really an issue, as stronger non-toxic solvents are available to us (the company sells a citrus solvent, and Estisol is a viable option). More research, especially in lithography where we never tested the ink, is needed. If one ink, and one clean-up process, could be established across the board, the print shops would be that much more efficient.Those sensitive to the smell of linseed oil will not be able to use these inks.
Oil Based Colour Ink Mixing
Check that your palette knife that it is clean. (Avoid contaminating the colour in the cans.)
Always remove only the top layer of ink from the cans. Please do not gouge!
Pursue the habit of mixing your own personalized colours!
Avoid just using the standardized/generic colours from the can.
Mix colours by starting with a SMALL amount of ink.
Add small amounts of colour to the base ink. (Otherwise, you'll end up mixing mountains of ink that you'll never use!)
Primary colours/Process colours will produce a wide range of hue and allow for optical mixing.
Add Black and White to process colours for modifying value in colour.
Once you are satisfied witha sample micture, create sufficient amount for printing. Keep in wax paper with tape to store.
For future reference, keep notes on the colour recipes that you mix or make a colour sampler of the mixed ink. Create swatches or draw-downs colour samples on planned printing paper.
To modify inks:
- for transparency, add transparent base (up to 50 or 60% mix)
- for opacity, add white, etc.
Mixing lights and darks
To lighten a colour...
- add white (more opague + less intensity + dulls colour)
- add transparent base (to tint + lets paper or colours remain visible)
- add a lighter colour (ie. yellow) to lighten a darker colour
To darken a color...
- add black (more opague + less intensity + dulls colours)
- add a dark colour (ie. dark blue) or add complementary colours
Transparent Colours
- To create a transparent colour layer, begin with transparent base, then add opaque coloured ink. Reds, oranges, yellows are often more transparent than dark colours. A transparent colour tints an underlying colour to create a third.
- For opaque colours, being with ink, then add extender base as desired.
- For translucent colour: colour is not opaque or transparent and allows some of the colour underneath to be visible. (add some transparent base)
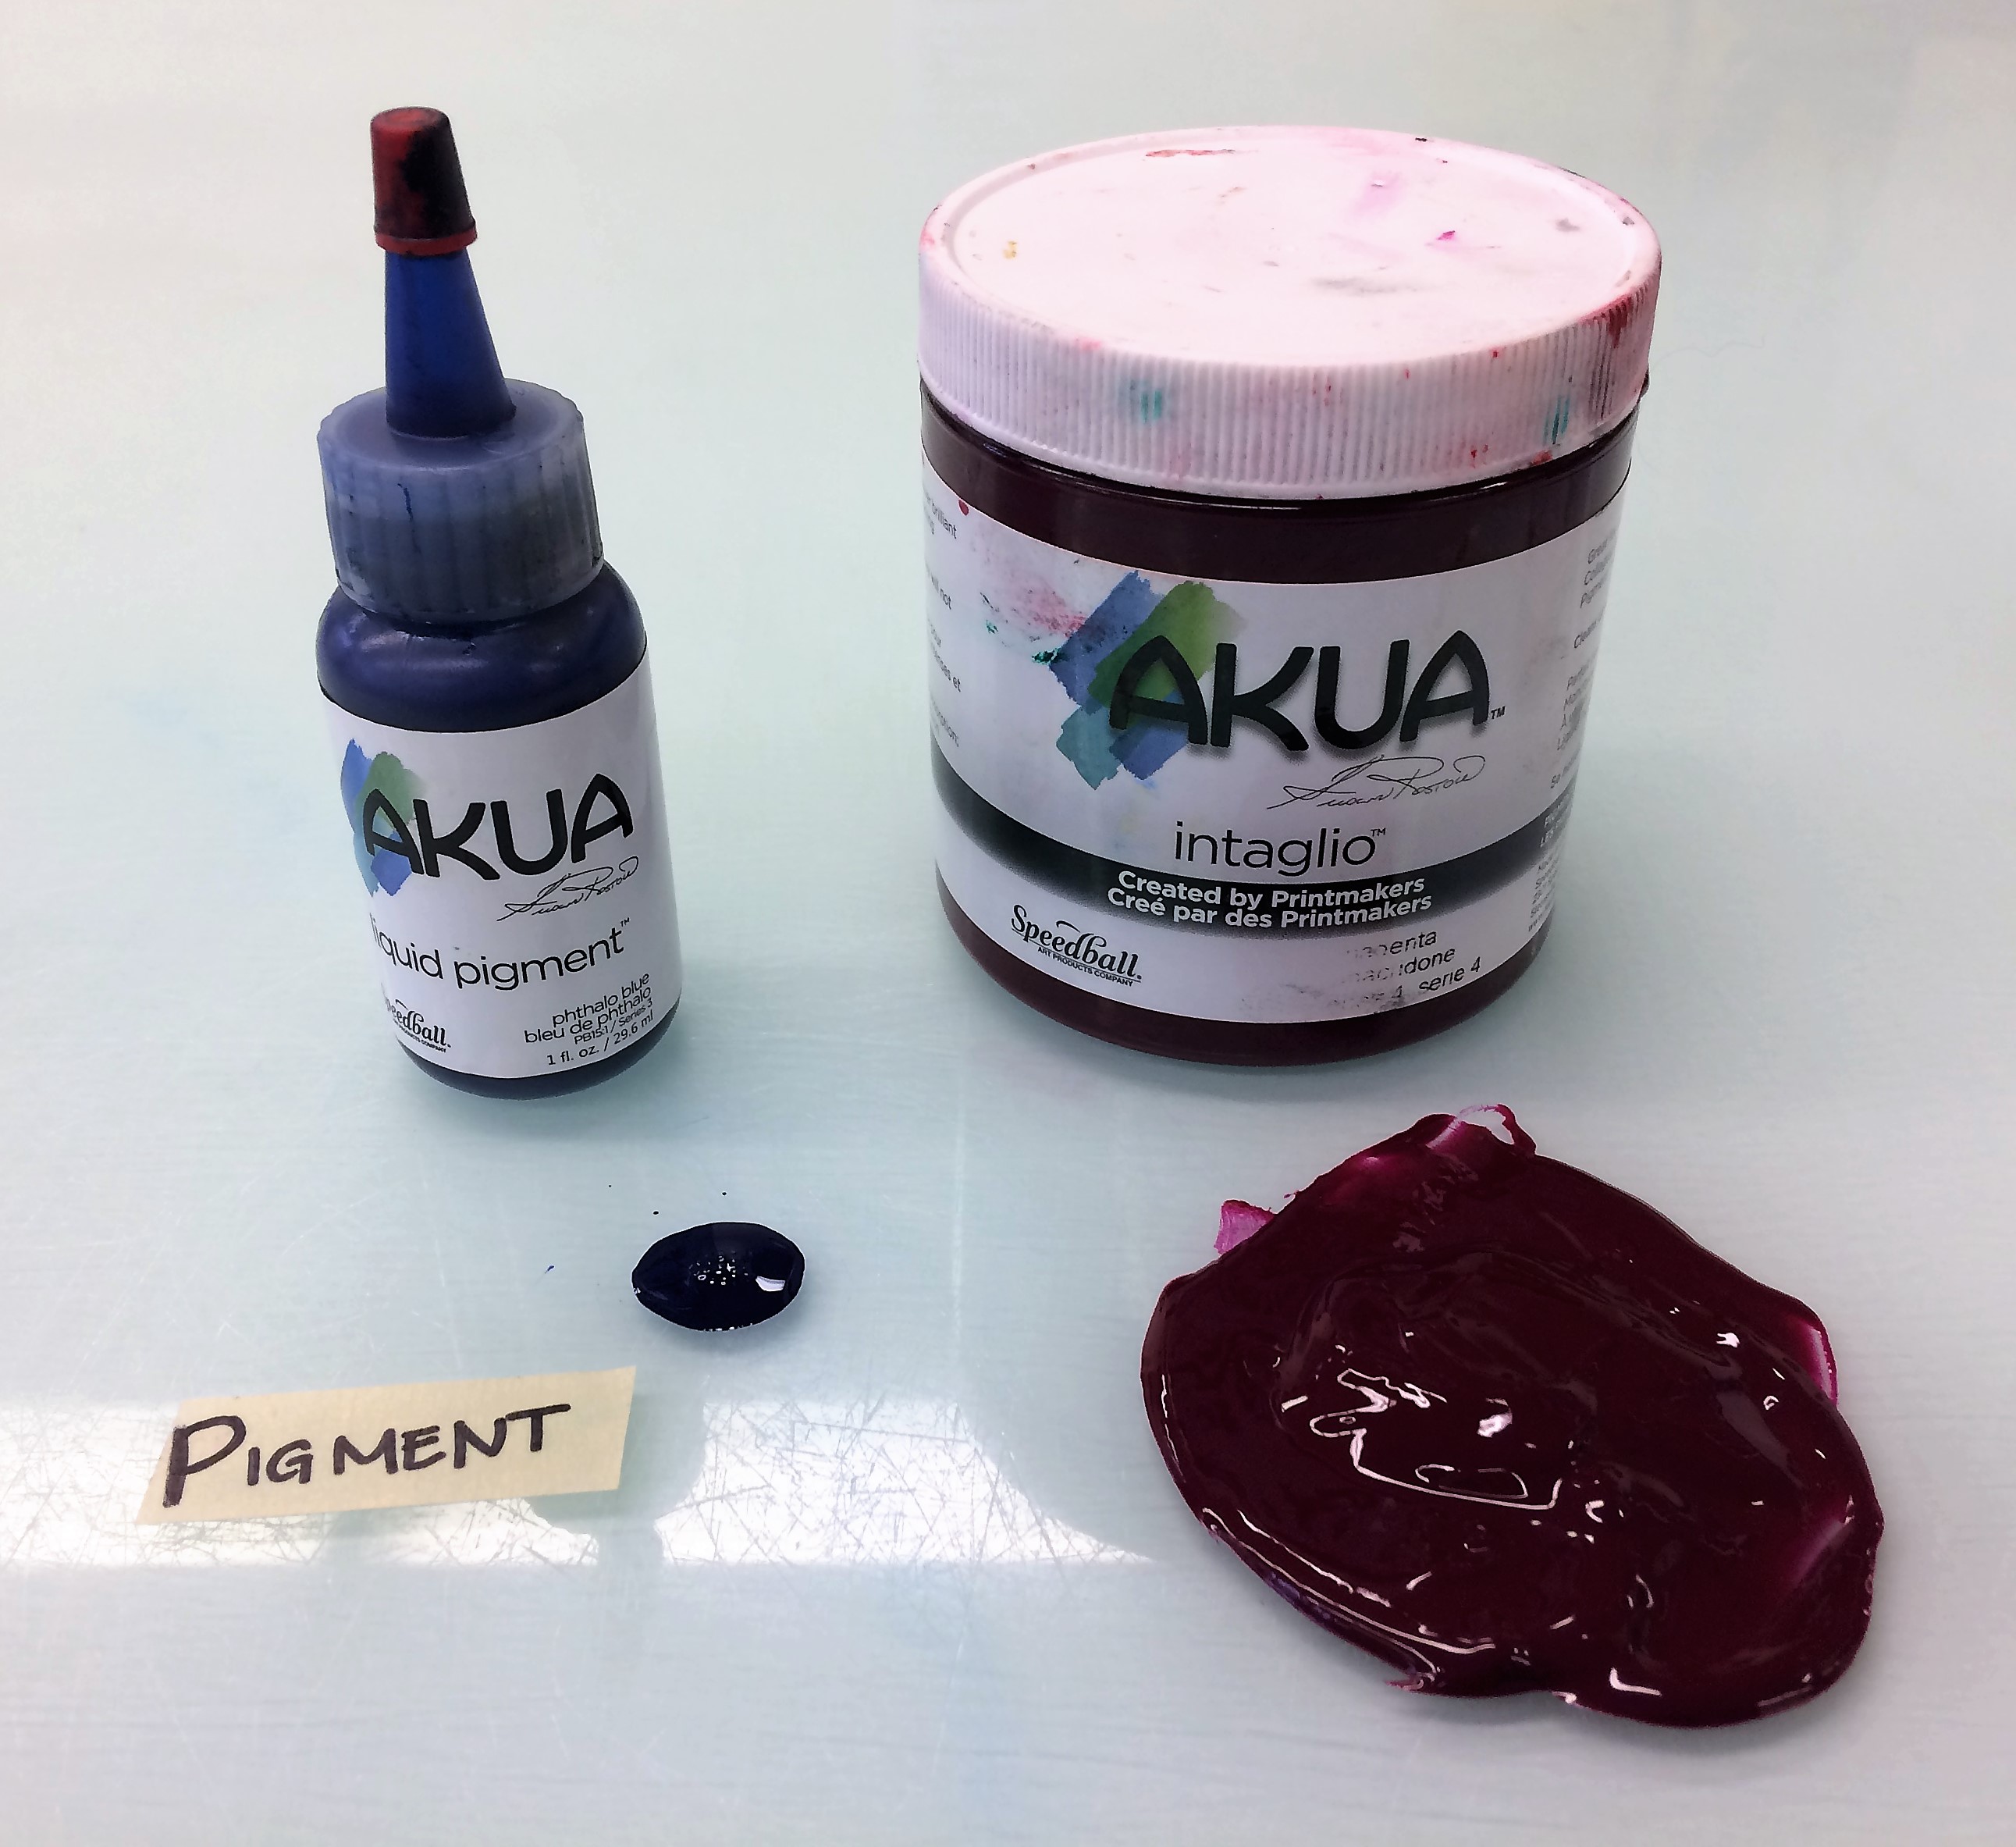
Akua
Akua makes metallic inks. They are best mixed with other inks to give them a metallic sheen. For surface rolls, mix the ink and roll up as you normally would. Follow with a roll of lift agent. The lift agent cannot be seen but helps the ink transfer to the paper. For intaglio, card the ink on, scrape it off, and before you move on to tarlatan and cleaning up plate tone, card on some lift agent. Let it sit for about a minute and then proceed with wiping. The lift agent is slippery and wiping will go quickly (the ink, however, will NOT wipe out of your lines, unless you seriously over-wipe).
Modifiers
AKUA Modifiers
- Transparent base reducese the intensity of the pigment, best to add ink to the transparent base. AKUA blending medium acts as the water to the AKUA intaglio ink, thins out ink for brush work or washes.
- Liquid pigment draw or paint with blending medium. Adding a drop of liquid pigment creates colour veins, visible separation, creates a good outcome. Less pressure on press when printing or print by hand. Use more cotton type paper like rag, otherwise the ink spreads too fast.
- AKUA + Mag mix thickens the ink and adds more body, may look like it changes the inks colour but once it dries, the rich colour reappears.
- Tack thickener + AKUA liquid pigment ⭱ add little amounts of liquid pigment to the tack thickener, otherwise it will clump up, produces more solid bodied ink.
- Release agent for ghost prints, roll it on after a print has run off the plate, pulls out the residue ink. Make sure to let it sit for 5 mins. before printing, it will soften the inks and allows transfer to paper.
- Metallic inks more flake than pigment, release agent keeps ink from sticking to the plate and eliminates paper rippling. Usually has a strong, vibrant colour if retarder is rolled on to plate after the desired ink is applied. Leave on for 3-5 mins then print/press.
- Retarder few drops on liquid pigment extends ink, build layers of ink to add intensity.
- Liquid pigment can be mixed with alcohol inks or alcohol itself to create tie die colour bled effects.
- A warm studio will keep the ink fluid and easy to work with. Paper and ink will dry faster too.
Videos
Safer Printmaking Intaglio
(Source: Henrik Bøegh's Youtube channel)
Etching
Liquid Hard Ground
Roll on Soft Ground
Hand Painted Grounds and Washes
Aquatint
Lift Ground and Spray on Hard Ground
Resist and Grounds Stripping
Examples
Photopolymer Intaglio
(Source: Henrik Bøegh's Youtube channel)
LASCAUX Etching Grounds
(Source: Henrik Bøegh's Youtube channel)
Lascaux Plate Backing Resist
Lascaux Hard Resist
Copper Etching and Photopolymer
(Source: The Printmakers Compendium by Tara Cooper)
Copper Photopolymer: Step One - Drawing (Spit Bite Method)
Copper Etching and Photopolymer: Step Two - Backing and Filing
Copper Etching Soft Ground: Step Three - Etching
Copper Photopolymer: Step Four - Developing
Copper Etching and Photopolymer - Press Prep
Copper Etching and Photopolymer – Applying Ink
Intaglio Etching in Ferric Chloride
(Source: The Printmakers Compendium by Tara Cooper)
Copper Etching Hard Ground: Step One – Applying Floorwax
Copper Etching Hard Ground: Step Two – Drawing
Copper Etching Hard Ground: Step Three – Etching
Copper Etching Aquatint: Step Two – Drawing
Quick Tip: Etching – Adding a top roll or flat of colour
Cleaning Tips
Safer Printmaking Cleaning – A Word of Caution
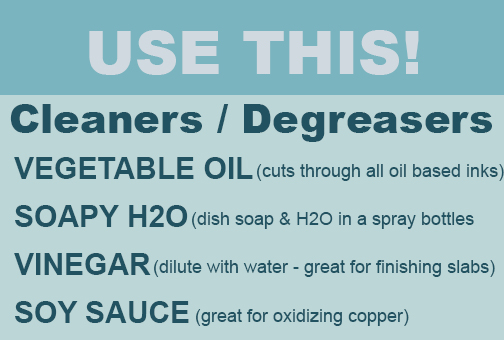
There are several institutions in Canada including the University of Saskatchewan, Nova Scotia College of Art and Design, the Ontario College of Art and Design, Queens University, The University of Alberta, who have successfully made the cross-over to non-toxic vegetable cleaners. Representatives from other institutions who have replaced Varsol and other petroleum based cleaners with Estisol or soy-based non-toxic vegetable cleaners. There is a learning curve when making the transition from petroleum-based to vegetable-based solvents. Vegetable-based solvents can destroy rollers if not removed properly and cleaned up completely.
Vegetable Cleaning Agent (VCA)
VCA removes printing ink, wax, oil, vaseline and wax-containing etching grounds. After cleaning with VCA, plates are washed with soap and water. VCAs containing emulsifiers may be removed with water only. NB: Detergents are manufactured from mineral oil, soap from vegetable oil or animal fat. The use of soap is suggested. In a small studio a line-up of a tray of VCA and a tray with water and detergent next to a sink with running water will do well. For minor or occasional work, spread a few drops of VCA over your plate, let stand, rub off, wash with water and soap, rinse with running water. For larger printmaking studios several kinds of equipment are in use. Usually plates are placed in a vertical tank with a frontal opening and brushed with VCA. This tank has a grid at the bottom beneath which the silt-VCA mixture sits. This mixture can continue to be used. Next the plate is moved to a second tank, sprayed with diluted detergent and rinsed with water. This tank may have an overflow, after which the water runs into the sewer.
Cleaning Tools & Equipment
VCA can be used to clean any metal or glass surface. Stone surfaces can be cleaned with VCA if they are compact or smoothly polished. Most plastics and rubbers can be cleaned with VCA, if in doubt do some testing. Swelling of rubbers may occur if articles are left immersed in VCA or cleaned frequently in it.
Etching Plates
-
Pour an inch or less of VCA into the first tray, fill the second tray with soap and water, lay a soft long-haired brush with both trays.
-
Put your etching plate covered with etching ground or printing ink in the first tray, brush your plate with VCA and let the ground or ink dissolve . This will take half a minute or longer, depending on the thickness of the layer.
-
Repeat this and let the VCA drip from your plate.
-
Put the plate in the second tray and wash it with soap, which emulsifies the VCA.
-
Next hold the plate under the tap and let the water run freely over it.
-
Wipe the plate off with a clean cloth and put it on the warm oven for drying. This is especially necessary for iron, steel or steel faced plates, which corrode quickly when wet.
-
Your plate is now ready for printing. If, however, you want to etch it again it has to be degreased thoroughly before applying any ground. NB: There are fluid rinsers, mixtures of soaps and esters, commercially available which are powerful degreasers and non-volatile.
Plates, Slabs, Rollers and Knives
Hot plates, ink slabs, rollers and knives can be cleaned with VCA and thereafter with soap and water.
-
To save VCA, first take off the excess ink from the plate or tool with a rag, then smear with a cheap vegetable oil, (sunflower, soy or rape oil - all cheaper than VCA). The oil will dilute the ink
-
After wiping off the oil-ink mixture with a rag, smear with just a few drops of VCA and wait half a minute or longer.
-
Take off the mixture of ink and VCA with a rag, smear again with VCA if necessary.
-
Wash with water and soap, rinse with water, dry thoroughly.
Note: When cleaning electrical hot plates, avoid water getting into the circuits. Simply use damp (not wet) cloths, do not be free with water. Keep all these washing rags well away from lithographic stones or plates, which must never be touched with soap.
Brushes
Brushes used in painting with oil or alkyd paint can also be cleaned with VCA.
-
Fill a jar with some VCA.
-
Remove excess paint from your brush.
-
Stir the brush in the VCA and rub it against the bottom of the jar until it is saturated.
-
Let the VCA dissolve the paint for about a minute.
-
Squeeze the excess VCA from your brush above the jar.
-
Wash your brush with soap to emulsify the VCA, rinse it thoroughly with lukewarm water and let it dry. Now ready to use, your brush will be cleaner than had you used volatile organic solvents.
Cleaning up after using A.G. Nile Hard/soft ground product can be efficiently completed by using a combination of the following: Warm water Liquid Dish Soap (Dawn, Ajax etc.) Baking Soda (Sodium Bicarbonate) Orange Oil/Olive Oil/ or Vegetable Oil.
Many artists also use a product called GEOWASH K that contains vegetable oils and is “one of the most environmentally friendly and active solvent/detergent on the market”. See below for an organic form of Turpentine called KLEAN STRIP GREEN
http://www.amazon.com/Klean-Strip-Green-QKGT7…/…/ref=sr_1_4…http://www.polymetaal.nl/…/01-geow…/geowash-k-instructie.htm
http://www.polymetaal.nl/sit…/shopukwork/en-gb/dept_667.html
Suppliers
- Anderson & Vreeland - Photopolymer plate supplier
- BIG Etching Ground – great new hard and soft ground
- Cape Fear Press - PURETCH supplier
- CG Metal - For copper and etching tools
- Cranfield - Inks and etching supplies
- Curry's Artists' Materials - Intaglio inks and equipment
- E.C. Lyons Company - Engraving and relief supplies
- Fuji Hunt - Ferric chloride supplier
- Hampton Editions, Ltd. – Solar plate distributor
- Laird Plastics - Plexiglass supplier
- Opus Art Supplies - Intaglio inks and equipment
- Polymetaal Site - Intaglio ink supplies and equipment
- Renaissance Graphic Arts - Intagilo inks and equipment
- Speedball - Intaglio inks and equipment
- Takach Press - Ink supplies
- Toyobo - photoploymer plate supplier
- Z*Acryl - Ectching supplies and ferric chloride solutions